
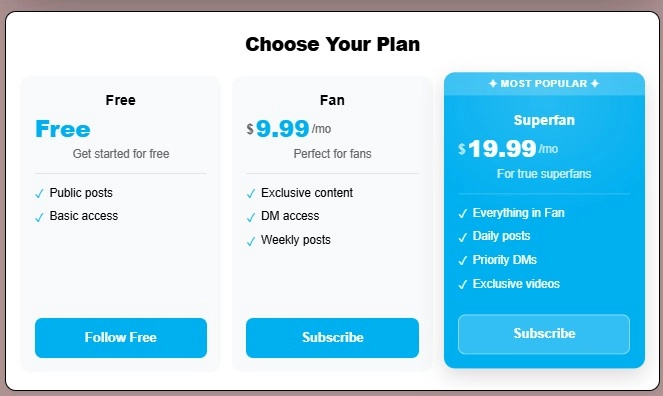

Most OnlyFans creators launch with a single subscription price and leave it there. One tier, one price, take it or leave it. The problem with that approach is that it forces every potential subscriber to make a binary decision — the price either works for them or it does not.
Subscription tiers solve that. By offering two or three pricing options, you give fans a choice instead of a barrier. The fan who would never pay $25 per month might happily pay $9. The superfan who would pay $25 will pay it — and might pay more if you give them a reason to. Tiered pricing is one of the most reliable ways to increase both your subscriber count and your average revenue per subscriber at the same time.
This guide covers how subscription tiers work on OnlyFans, how to structure your pricing, and how to display your tiers on your bio link page using the Subscription Tier block on Bio-Link.se.
Why Subscription Tiers Work
The psychology behind tiered pricing is well established. When people see multiple options at different price points, they anchor their expectations around the middle option. The cheapest tier makes the middle tier feel reasonable. The most expensive tier makes the middle tier feel like good value. This is sometimes called the decoy effect — and it works.
For OnlyFans creators specifically, tiers serve another purpose: they segment your audience. Not everyone who follows you on Instagram or TikTok has the same level of interest or the same budget. A free or low-cost entry tier captures fans who are curious but not yet committed. A mid-range tier captures your core audience. A premium tier captures your most dedicated supporters who want exclusive access and are willing to pay for it.
Without tiers, you lose the bottom and the top of that audience. The curious fan who might have subscribed at $5 bounces at $20. The superfan who would have paid $50 for something exclusive pays the same $20 as everyone else.
How to Structure Your OnlyFans Subscription Tiers
The most effective structure for OnlyFans creators is three tiers — a low entry point, a core mid-range option, and a premium tier for your most dedicated fans.
Tier 1 — Fan (Entry)
Price:    $4.99 – $9.99 / month
Purpose:  Capture curious followers, low-commitment entry
Content:  Basic feed access, occasional exclusive posts
CTA:      "Subscribe"
Tier 2 — Supporter (Core) — Featured
Price:    $14.99 – $24.99 / month
Purpose:  Your main revenue tier, best value positioning
Content:  Full feed access, DMs, monthly bonus content
Badge:    "Most Popular"
CTA:      "Join Now"
Tier 3 — VIP (Premium)
Price:    $29.99 – $49.99 / month
Purpose:  Maximum revenue from superfans
Content:  Everything in Supporter + custom content, priority DMs
Badge:    "Best Value" or "VIP Access"
CTA:      "Go VIP"
The middle tier should be marked as Featured — this makes it visually prominent and anchors fan expectations around it. The Subscription Tier block on Bio-Link.se handles this automatically: the featured card elevates slightly and uses your accent color as a background, making it stand out without any extra configuration.
Setting Up the Subscription Tier Block
The Subscription Tier block on Bio-Link.se is built specifically for OnlyFans and Fansly creators. When you add the block to your bio link page, you can configure up to four tiers and control every detail of how they are displayed.
Platform selection
The block has a platform selector — OnlyFans, Fansly or Custom. Selecting OnlyFans or Fansly automatically sets the accent color to the platform’s brand color: OnlyFans blue (#00AFF0) or Fansly purple (#8B5CF6). You can override this manually if you prefer a color that matches your personal brand.
Tier configuration
For each tier you set:
✓ Tier Name        — Fan, Supporter, VIP, etc.
✓ Price            — Displayed with $ prefix automatically
✓ Period           — Monthly, Yearly, Weekly or Lifetime
✓ CTA Text         — Subscribe, Join Now, Go VIP, etc.
✓ URL              — Direct link to your OnlyFans subscription page
✓ Description      — One line summarizing what's included
✓ Featured toggle  — Highlights this tier visually
✓ Badge Text       — "Most Popular", "Best Value", etc.
✓ Features list    — Up to 8 bullet points, each toggled on/off
The features list is where you communicate value. Each feature item has a checkbox — enabled features show with a checkmark, disabled features show with a strikethrough. This lets you clearly communicate what each tier includes and excludes, which reduces subscriber hesitation and DM questions about pricing.
Layout options
On desktop the grid defaults to three columns — one per tier. You can switch to one or two columns if you prefer a more focused layout. On mobile the block automatically collapses to a single column so all tiers stack cleanly on smaller screens.
Writing Feature Lists That Convert
The feature list is the most important part of each tier card. This is where fans decide whether the price is worth it. Write your features the way a subscriber thinks, not the way a creator thinks.
Instead of:
✗ Exclusive content
✗ DM access
✗ Custom requests
Write:
✓ 20+ exclusive posts per month
✓ Direct messages answered within 24h
✓ One custom photo request per month
✓ Early access to new content
✓ Behind-the-scenes footage
Specificity converts. ”20+ exclusive posts” is more convincing than ”exclusive content” because it answers the question every fan has before subscribing: what am I actually getting?
For your featured mid-range tier, make the feature list longer and more detailed than the other tiers. The visual weight of a longer list signals better value even before the fan reads it.
Using the Featured Tier to Drive Upgrades
The Featured toggle does more than add visual emphasis. It creates a psychological anchor point for your pricing page. When one tier stands out, fans naturally evaluate the other tiers relative to it.
Set your mid-range tier as Featured with a badge like ”Most Popular” or ”Best Value”. This signals social proof — the implication is that most of your subscribers choose this tier. Even if that is not yet true, the badge sets an expectation and nudges undecided fans toward the middle option.
On the Subscription Tier block, the featured card:
✓ Uses your accent color as the card background
✓ Elevates slightly above the other cards on desktop
✓ Displays a subtle glow effect behind the card
✓ Shows the badge text in a highlighted banner at the top
✓ Uses white text throughout for contrast on the colored background
✓ Has a semi-transparent CTA button with a white border
All of this happens automatically when you enable the Featured toggle — no custom styling required.
Styling Your Subscription Tiers
The block includes a full style settings panel that lets you match your tiers to your personal brand.
Colors you can configure:
Accent Color         — Featured tier background, prices, checkmarks
Background Color     — Outer wrapper background
Card Background      — Non-featured card background
Title Color          — Block title text
Text Color           — Tier name and feature text
Muted Text Color     — Price period, descriptions
Shape options:
Straight   — 0px border radius, clean and modern
Rounded    — 12px border radius, default and recommended
Pill       — 24px border radius, soft and friendly
Shadow options:
None    — Flat, minimal aesthetic
Subtle  — Light shadow, default
Strong  — More depth, good on light backgrounds
Hard    — Offset shadow, editorial feel
For OnlyFans creators, the Rounded shape with Subtle shadow is the most versatile combination — it works across dark and light bio link themes and gives the cards enough visual separation without feeling heavy.
Where to Place the Subscription Tier Block
Position matters. On your bio link page, the Subscription Tier block should appear above the fold or close to it — ideally after a short introduction or content teaser, but before any additional links.
The recommended order for an OnlyFans bio link page:
1. OF Hero block          — Profile image, name, tagline
2. Age Gate               — Verification (if enabled)
3. Content Teaser         — Blurred preview to create desire
4. Subscription Tier      — Pricing — the conversion point
5. Price Menu             — Custom content pricing
6. Tip Goal Tracker       — Community engagement
7. Social / platform links — Everything else
This order mirrors the way a new visitor moves through your page. They arrive, see who you are, verify their age, get a taste of your content, and then encounter your pricing at the exact moment their curiosity is highest.
👉 Set up your Subscription Tier block on Bio-Link.se →
Lifetime and Yearly Tiers — When to Use Them
The period selector in the Subscription Tier block includes Monthly, Weekly, Yearly and Lifetime options. Most OnlyFans creators use monthly pricing, but yearly and lifetime tiers have specific use cases worth considering.
Yearly tiers work well as a loyalty option — a discounted annual rate for fans who want to commit. Displaying a yearly tier alongside monthly pricing makes the monthly price feel more accessible by comparison.
Lifetime tiers are most effective during launches or milestone events. A one-time payment for permanent access creates urgency and generates upfront revenue. Position a lifetime tier as a limited offer and use the Badge Text field to communicate scarcity: ”Limited Spots” or ”Founding Member”.
Weekly tiers are useful if your audience is more casual or price-sensitive. A low weekly price lowers the psychological barrier to entry and can convert fans who would hesitate at a monthly commitment.
Connecting Your Tiers to Your OnlyFans Page
Each tier has a URL field that links directly to the corresponding subscription page on OnlyFans. When a fan clicks the CTA button on any tier card, they go directly to that subscription option — no extra steps.
Make sure each URL is correct before publishing. On OnlyFans, subscription tiers each have their own unique URL. Copy these directly from your OnlyFans dashboard and paste them into the URL field for each tier. The block tracks clicks via Bio-Link.se analytics so you can see which tier gets the most engagement and adjust your pricing or positioning accordingly.
Frequently Asked Questions
How many subscription tiers should I have on OnlyFans?
Three tiers is the most effective structure for most creators — an entry tier, a core mid-range tier marked as Featured, and a premium tier for superfans. More than four tiers creates decision fatigue and can reduce conversions.
What should I put in the feature list for each tier?
List specific, concrete benefits — number of posts per month, DM response time, custom content availability, early access. Avoid vague descriptions like ”exclusive content”. Specificity builds trust and reduces hesitation.
Can I use the Subscription Tier block for Fansly?
Yes. The block has a platform selector that includes Fansly. Selecting Fansly sets the accent color to Fansly purple automatically and the URL fields accept any Fansly subscription URL.
Where should the Subscription Tier block appear on my bio link page?
Place it after your content teaser and before additional links — ideally within the first scroll on mobile. Visitors convert best when they encounter pricing after seeing a preview of your content.
Can I offer a free tier?
Yes. Setting the price to 0 displays ”Free” instead of a price. A free tier is useful for capturing email subscribers or directing fans to a free trial before a paid upgrade.